How TOs and Walkthroughs
Here are some guides and walkthroughs on RVnGO platform features.
How do I create a profile?
Creating an RVnGO profile is quick and gives you access to the tools you need to rent an RV, list your RV, manage reservations, and more.
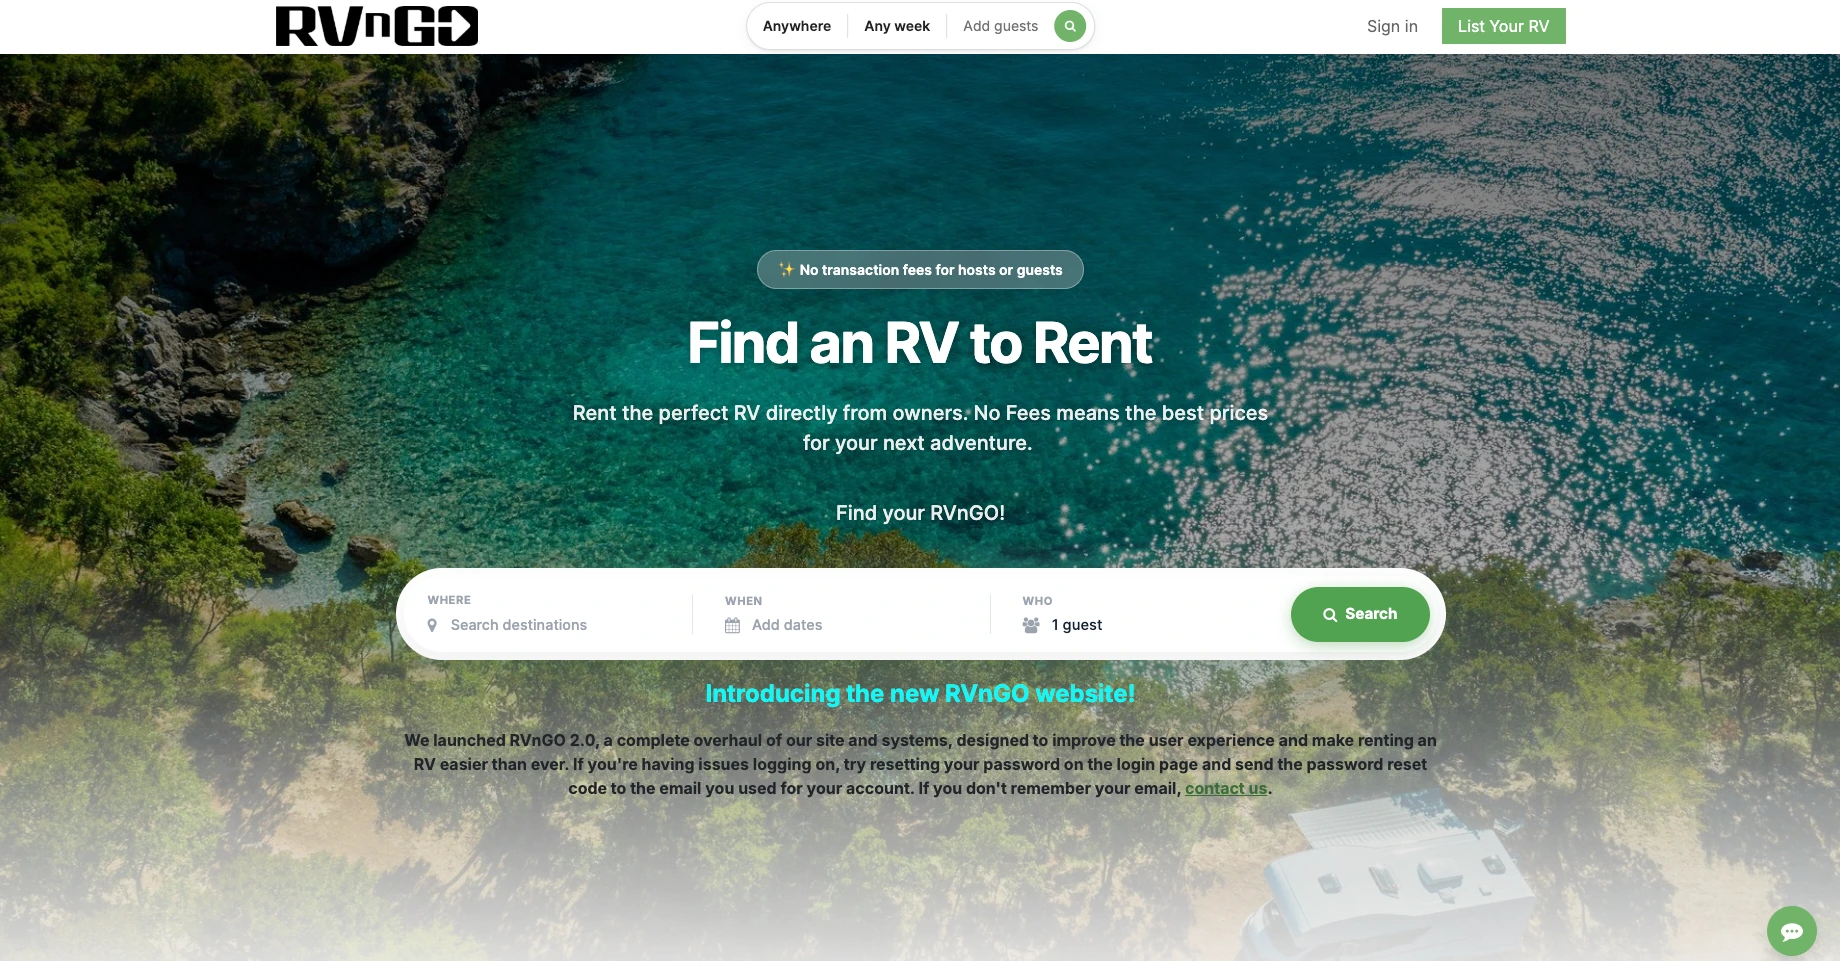
Step 1: Select Sign In
From the RVnGO homepage, select Sign in in the upper-right corner.
Step 2: Create a new account
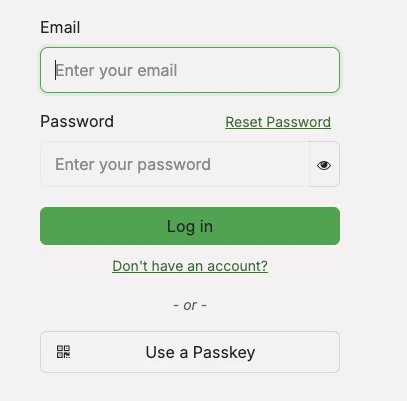
On the login page, select Don't have an account?
Step 3: Enter your information
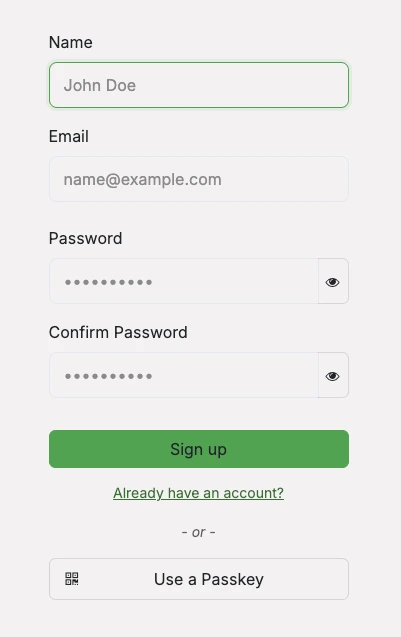
Complete the sign-up form with your:
- Name
- Email address
- Password
- Confirm Password
Once your information has been entered, select Sign up.
Step 4: Your RVnGO account is created
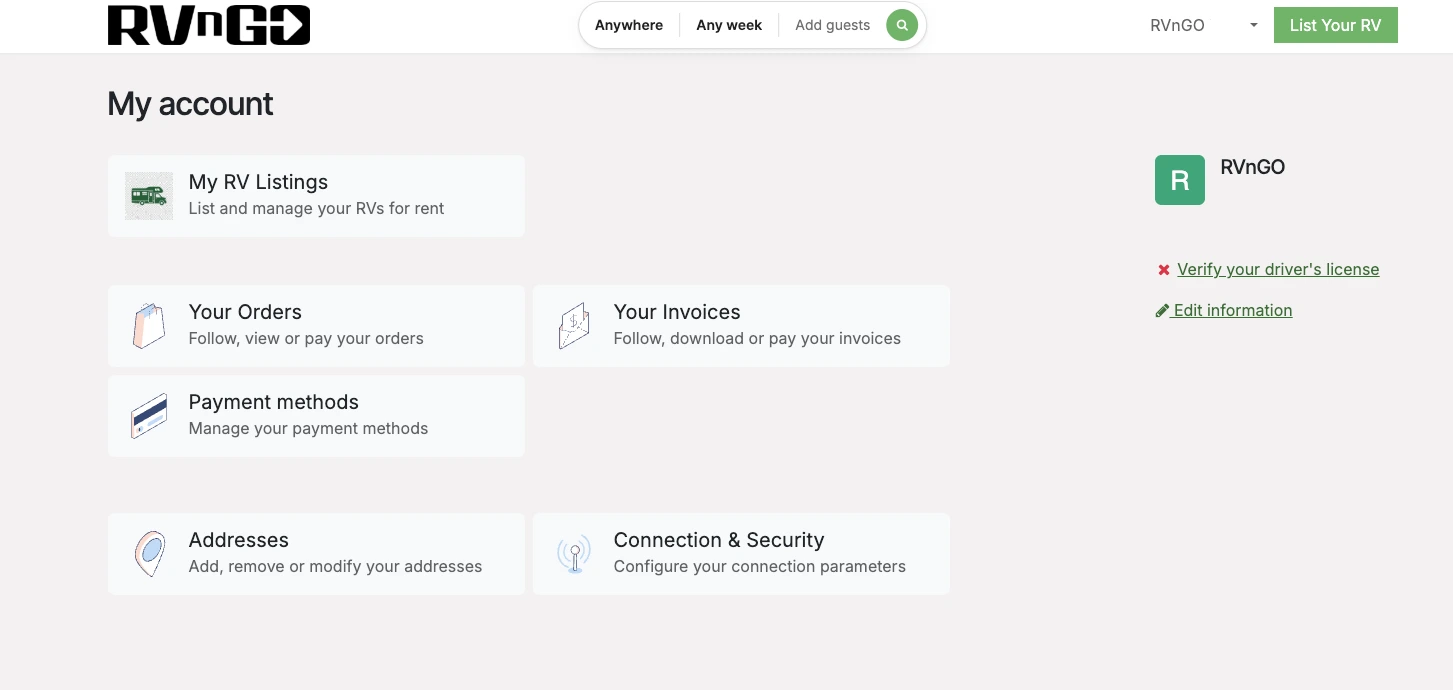
After signing up, you will automatically be signed in and taken to your My Account page.
RVnGO will also send an email confirming that your account has been created. The email will include a link you can use to access your account.
Step 5: Complete your profile
From My Account, you can manage your account and profile information.
Select Edit information to add or update your personal details.
You may also see additional account actions here, such as verifying your driver's license, adding addresses, and updating your Profile Photo.
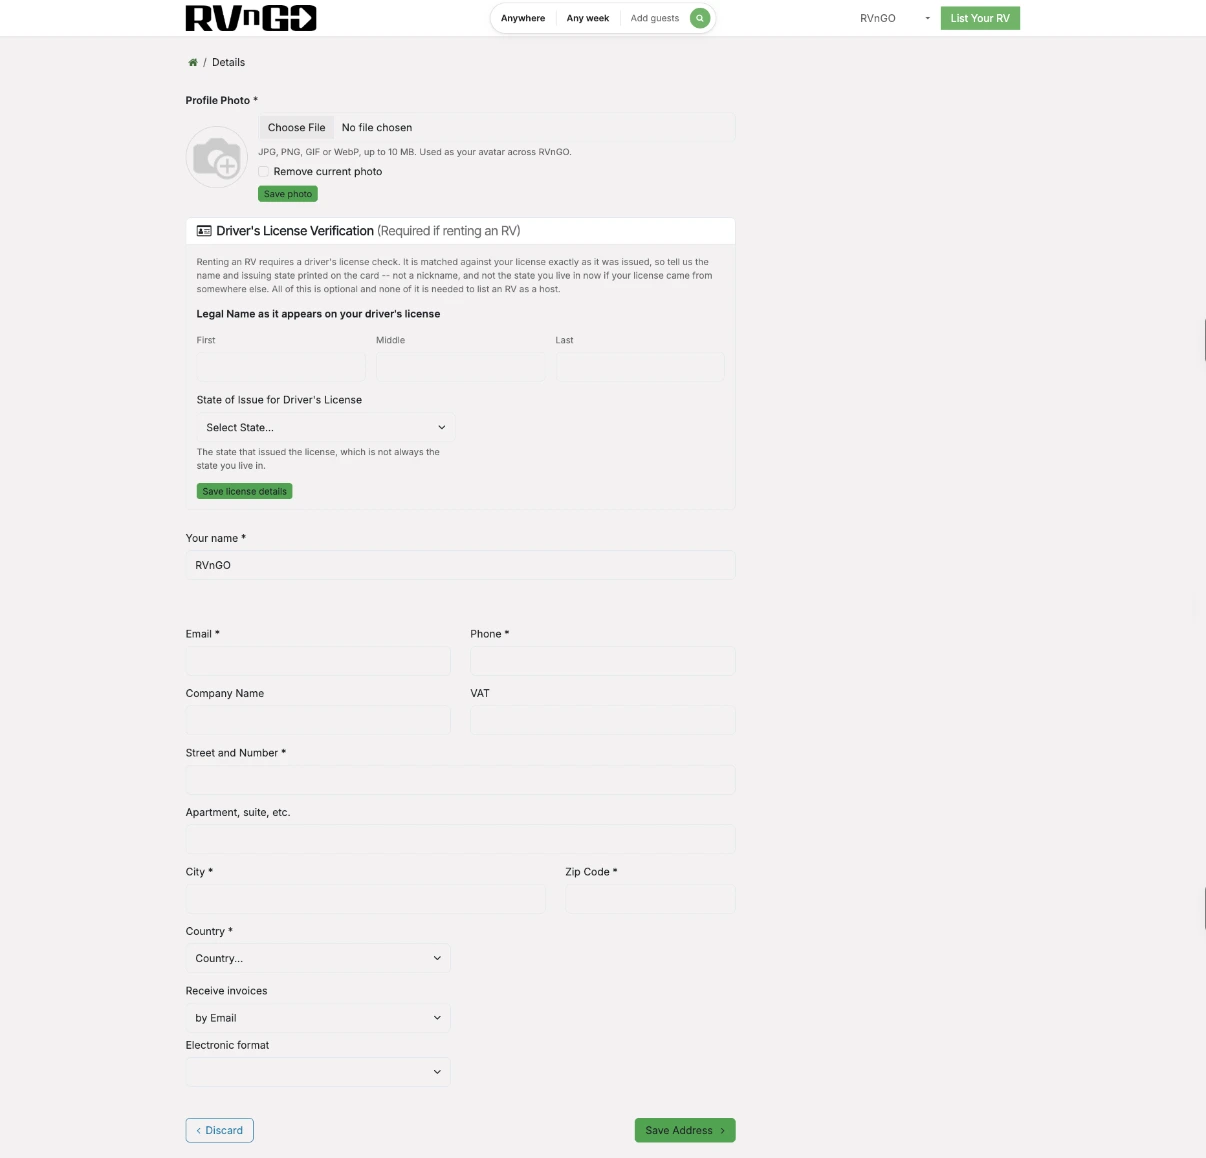
You're all set!
Your RVnGO profile has now been created. You can begin searching for RVs to rent or select List Your RV if you want to become an RVnGO Host.
How do I upload a driver's license?
RVnGO requires Guests renting an RV to complete driver's license verification. Your driver's license information must match your license exactly as it was issued.
Step 1: Go to My Account
Sign in to your RVnGO account and go to My Account.
If driver's license information or verification is required, you'll see Verify your driver's license next to your account information.
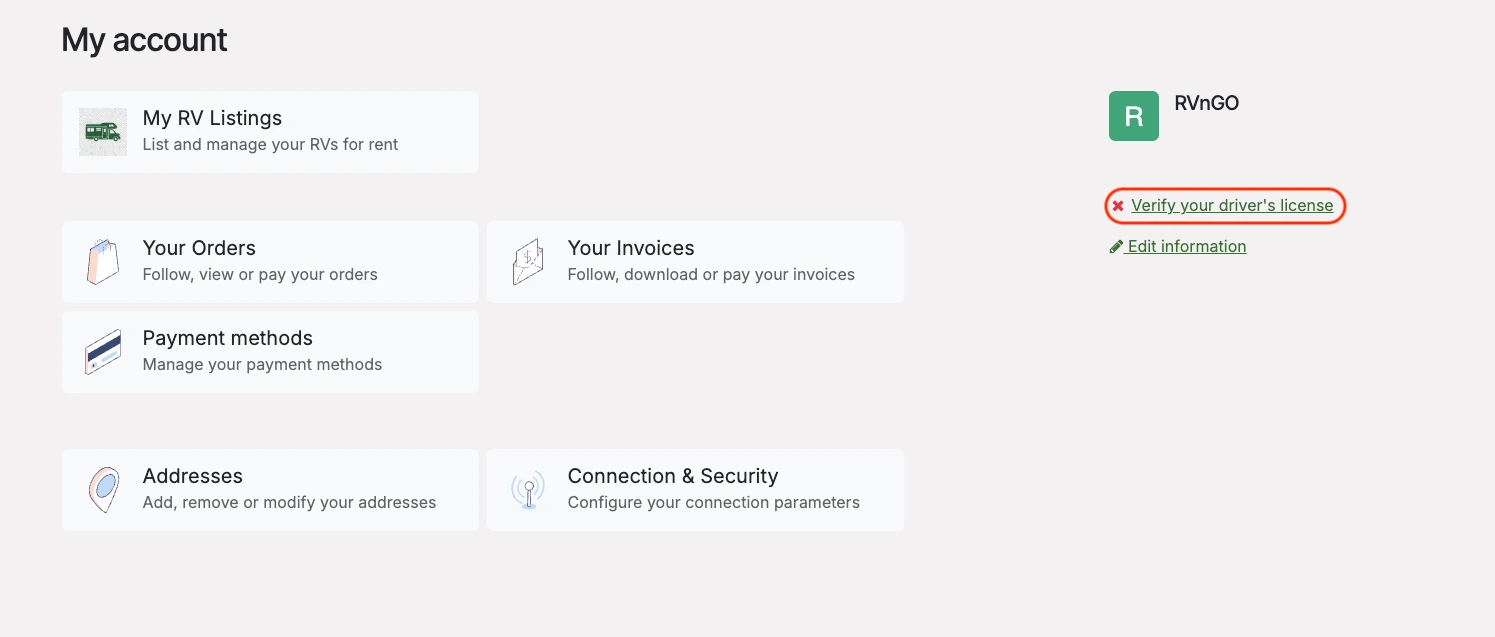
Step 2: Add your driver's license information
You can add your driver's license details from your profile by selecting Edit information.
Scroll to the Driver's License Verification section.
Enter your:
- Legal first name
- Legal middle name, if applicable
- Legal last name
- State of issue
Your name should be entered exactly as it appears on your driver's license.
Be sure to select the state that issued your license, which may be different from the state where you currently live.
Select Save license details when finished.
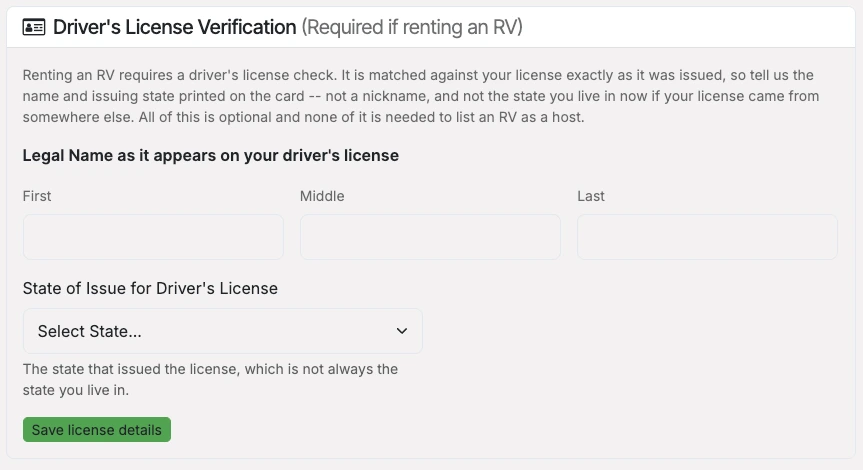
Step 3: Complete verification for your reservation
Driver's license verification is required when renting an RV.
When you have an upcoming Guest reservation that requires verification, it will appear on the Driver Verification page. RVnGO will prompt you to complete the required license verification as part of the booking process.
If you don't currently have a booking that requires verification, you'll see a message letting you know that there are no bookings waiting on license verification.
Verification will be requested automatically when applicable to your booking.
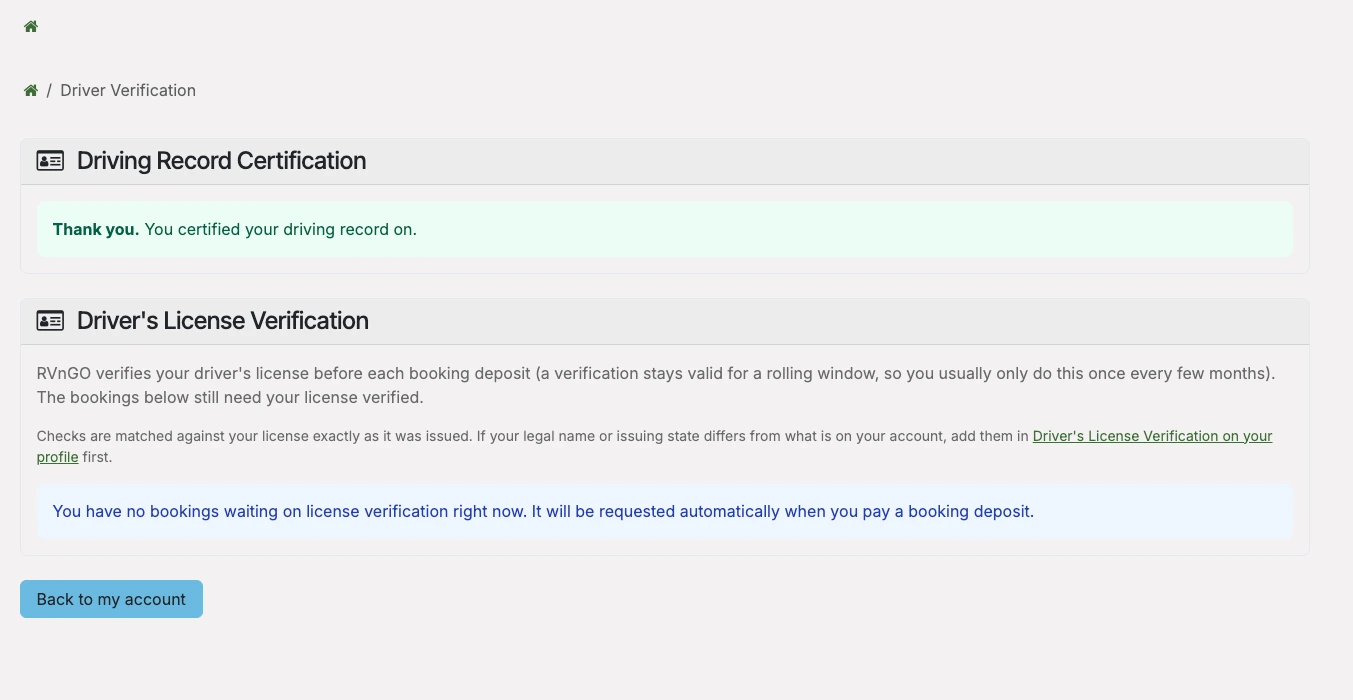
Important
Driver's license checks are matched against the information on your license. Make sure the legal name and issuing state saved to your RVnGO profile match your driver's license exactly to avoid verification issues.
Driver's license verification is required for Guests renting an RV. Hosts who are only listing an RV do not need to provide this information unless they are also renting an RV as a Guest.
Walkthrough coming soon.
Walkthrough coming soon.
How to Review, Approve, or Modify a Rental Inquiry
When a Guest sends a rental inquiry for your RV, you can review the trip details and pricing before deciding whether to approve or decline the request.
If the Guest needs different trip dates, you can also modify the rental dates before the booking moves forward.
Step 1: Find the Pending Inquiry
Log in to your RVnGO account and go to Manage Bookings.
Select the Pending tab to view rental inquiries that are waiting for your review.
Each pending inquiry displays important information, including:
The RV being requested
The Guest's name
Pickup and drop-off dates
Number of nights
Rental charges and fees
Taxes
Total booking amount
Balance due
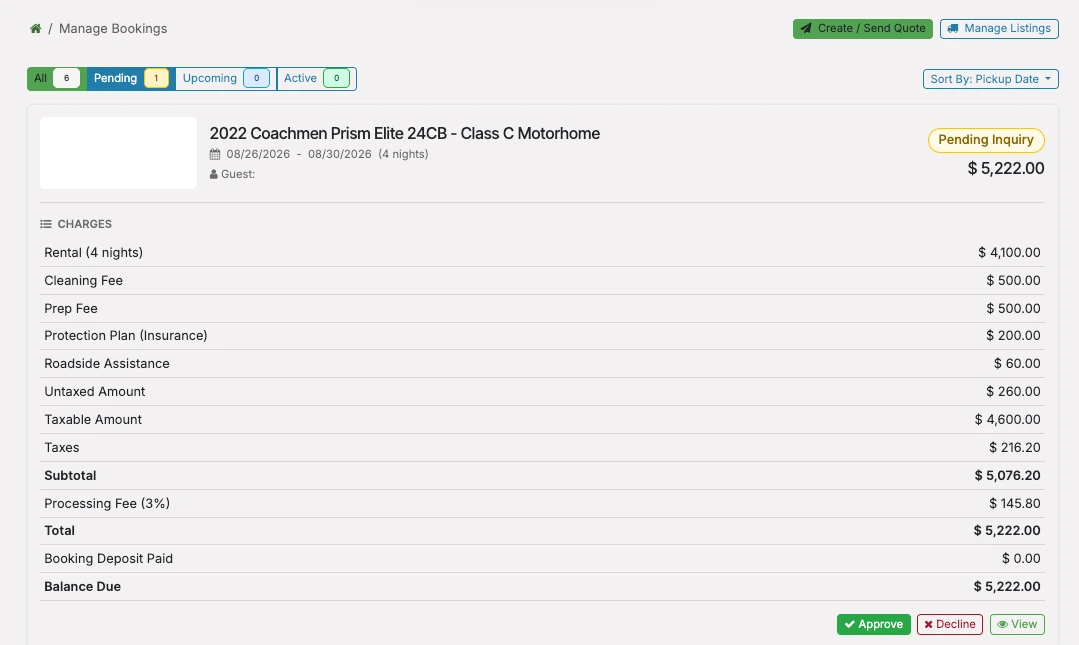
At the bottom of the inquiry, you will see three options:
Approve – Approve the Guest's rental inquiry.
Decline – Decline the inquiry.
View – Open the inquiry to review the complete booking details.
We recommend reviewing the booking details before approving the inquiry.
Step 2: Review the Booking Details
Click View to open the rental inquiry.
The booking page gives you a more detailed overview of the reservation, including the Guest's information, rental period, pricing, deposits, and payment details.
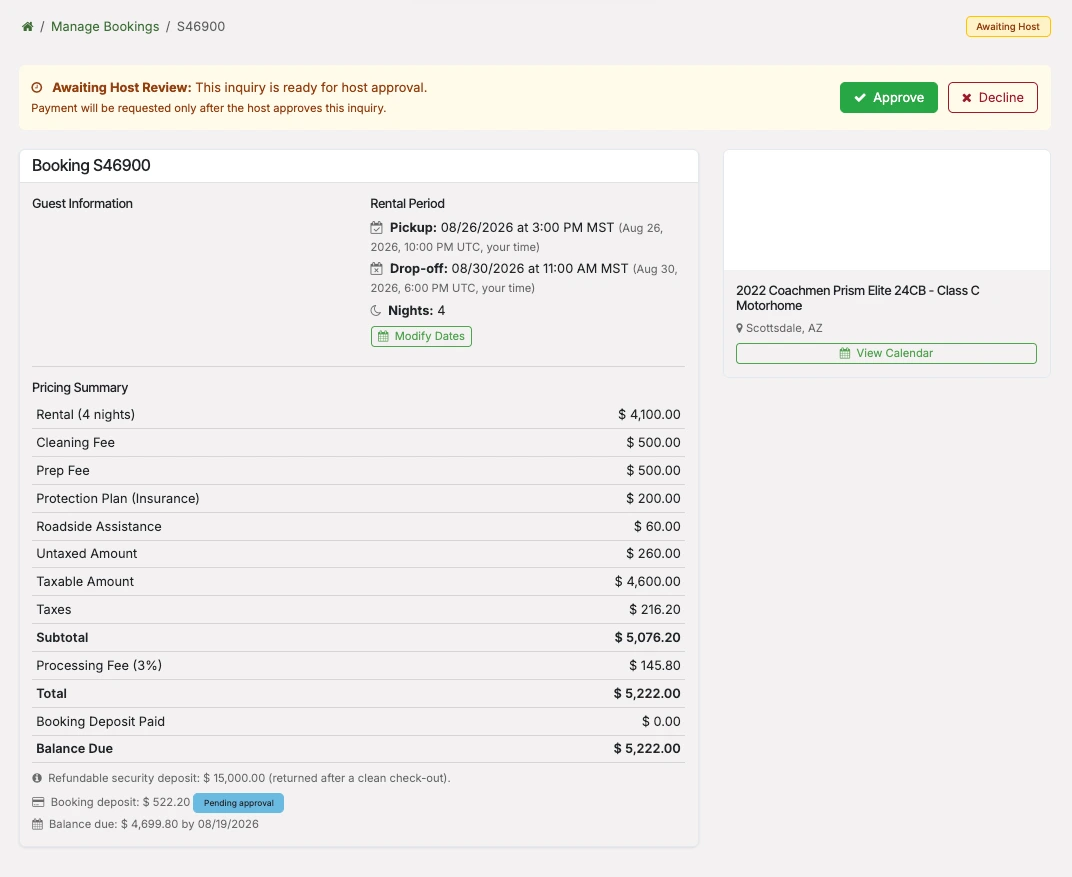
Before approving the inquiry, confirm that the following information is correct:
Guest information
Pickup date and time
Drop-off date and time
Number of nights
Rental price
Cleaning and preparation fees
Protection Plan and Roadside Assistance charges
Taxes and processing fees
Booking deposit
Total balance due
The Awaiting Host Review message at the top of the page means the inquiry is waiting for your decision.
Step 3: Modify the Trip Dates, If Needed
If the Guest needs to change the rental dates, you can update them before approving the booking.
Under Rental Period, click Modify Dates.
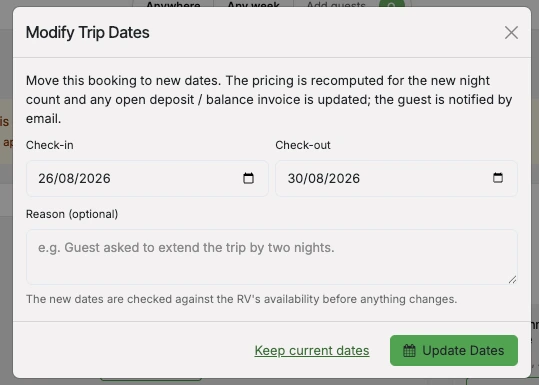
The Modify Trip Dates window will open.
Enter the new:
Check-in date
Check-out date
You can also enter an optional reason for the change.
RVnGO will check the new dates against your RV's availability before making the change.
The booking price will also be recalculated based on the new number of nights. Any open deposit or balance invoice will be updated, and the Guest will be notified of the change by email.
Click Update Dates to save the new dates.
If you do not want to make a change, select Keep current dates.
Step 4: Confirm the Updated Booking
After the dates are successfully changed, RVnGO will display a confirmation that the booking was updated and the Guest was notified.
Review the updated reservation details before continuing.
Important: Changing the rental dates may change the rental total, taxes, fees, deposit, or remaining balance. Always review the updated pricing before approving the inquiry.
Step 5: Approve or Decline the Inquiry
Once you have reviewed the reservation and confirmed that everything is correct, return to the booking.
To accept the rental request, click Approve.
If you cannot accommodate the reservation, click Decline instead.
What Happens When You Approve?
Approving the inquiry does not mean the Guest has completed the booking.
After approval, the booking moves to the next stage and the Guest must pay the required booking deposit.
The booking status will show that the deposit is pending until payment is completed.
From the booking page, you can also monitor the reservation's progress, including:
Approved → Deposit Paid → Balance Paid → Checked In → Checked Out → Complete
Once approved, continue monitoring the booking to make sure the Guest completes the required payment and other booking requirements before the trip.
You're All Set!
You've successfully reviewed the Guest's rental inquiry.
Remember:
Review the Guest, trip dates, and pricing before approving.
Use Modify Dates if the rental period needs to change.
Review the recalculated price after changing dates.
Select Approve when you're ready to accept the inquiry.
Approval is not the same as payment—the Guest must still complete the required booking deposit.
Need Help?
If you have questions about a rental inquiry or need assistance with a reservation, contact us at support@rvngo.com for help.
How to Create and Send a Quote
Hosts can create and send quotes directly to guests for custom reservations. This is useful when a guest contacts you before booking or when you want to provide a personalized reservation.
Step 1: Go to Manage Bookings
Step 2: Create a Quote
Step 3: Complete the Quote
- Trip dates
- Number of guests
- Optional discount (percentage or fixed amount)
Customer information
- Select an existing customer, or
- Create a quote for a new customer by entering their contact details.
- Add an optional message for the guest.
Step 4: Review the Quote
The Quote Summary on the right will automatically calculate the estimated charges based on the information you entered.
Once everything looks correct, click Send Quote.
The guest will receive the quote and can complete the booking online.
How to Create and Send an Insurance Only Quote
Insurance Only Quotes allow you to provide a guest with RVnGO's Protection Plan and Roadside Assistance without charging any rental, cleaning, prep, or add-on fees.
Step 1: Go to Manage Bookings
- Log in to your RVnGO account.
- Click My Account.
- Select Manage Bookings.
Step 2: Create a Quote
- Click Create / Send Quote.
- Select the RV you want to create the quote for.
Step 3: Enable Insurance Only
- On the quote page, locate the Insurance Only toggle in the Quote Summary panel.
- Turn the toggle On.
Once enabled:
- The nightly rental rate is removed.
- Cleaning fees are removed.
- Prep fees are removed.
- Add-ons are removed.
- Only the Protection Plan and Roadside Assistance charges remain.
Step 4: Complete the Quote
Fill in the reservation details:
- Trip dates
- Number of guests
Customer information
- Select an existing customer, or
- Create a new customer by entering their contact details.
- Add an optional message for the guest.
The quote summary will automatically update to display only the applicable insurance charges.
Step 5: Review and Send
Review the quote to ensure all details are correct.
Once everything looks good, click Send Quote.
The guest will receive the Insurance Only quote and can complete the booking online.
How do I update and block out my Host Calendar?
You can block dates on your RVnGO calendar when your RV is unavailable. This can be useful for personal trips, maintenance, repairs, or any other time you don't want Guests to request or book your RV.
Step 1: Go to My RV Listings
From My Account, select My RV Listings.
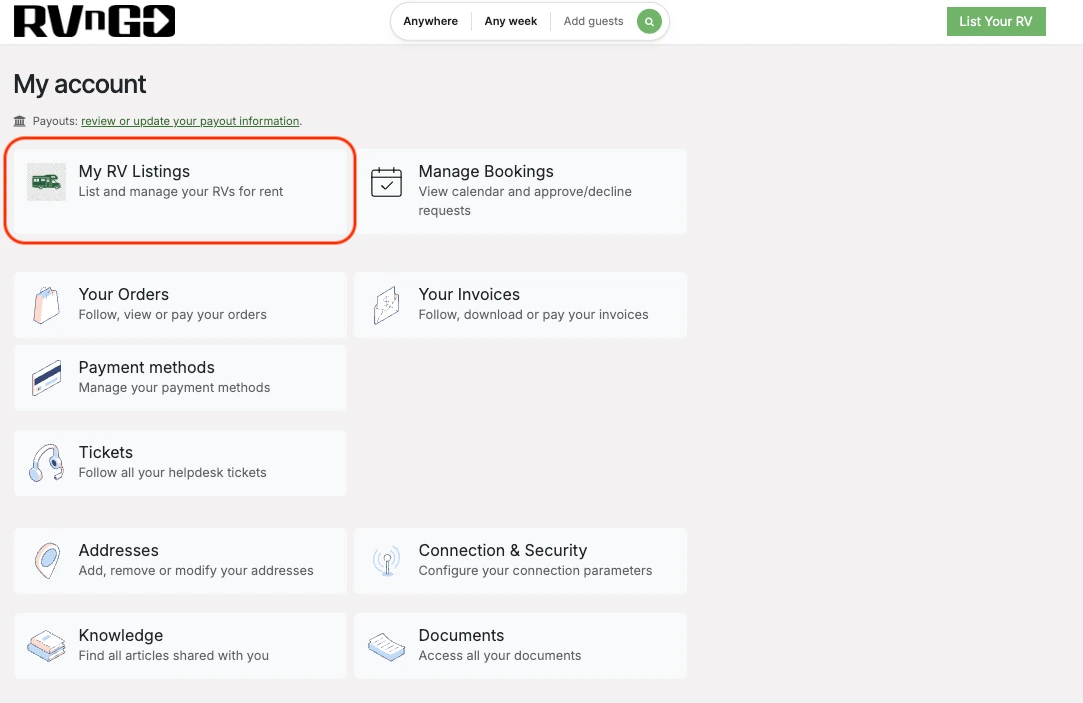
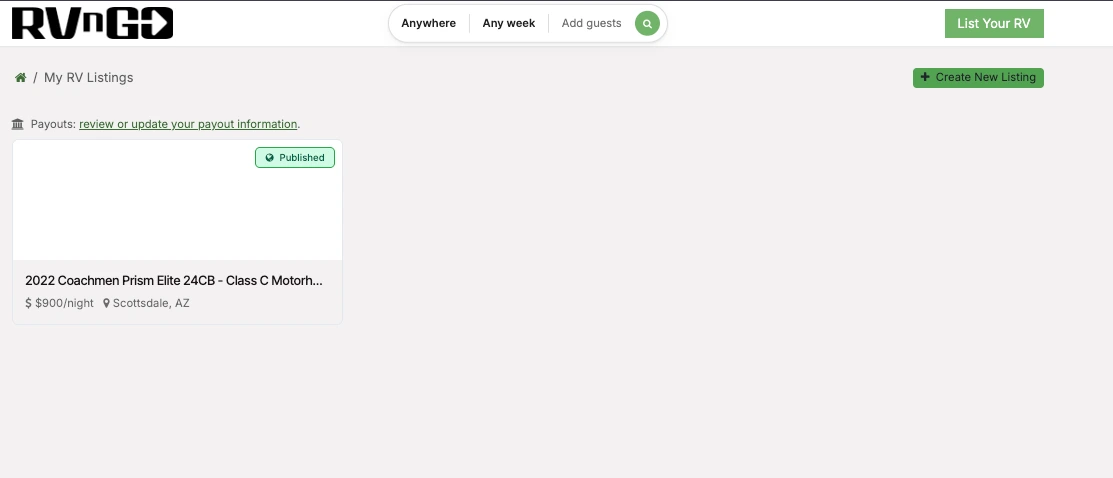
Step 2: Select your RV
On the My RV Listings page, select the RV listing whose calendar you want to update.
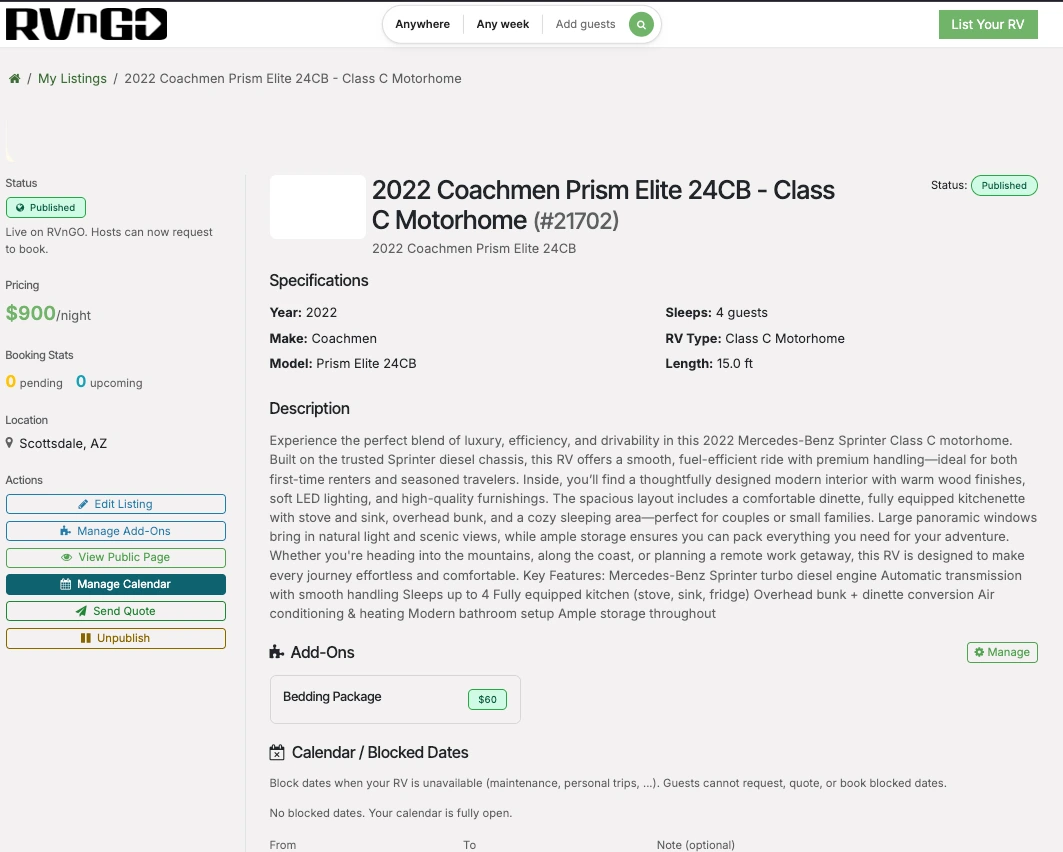
Step 3: Open Manage Calendar
On your RV listing page, select Manage Calendar from the Actions menu.
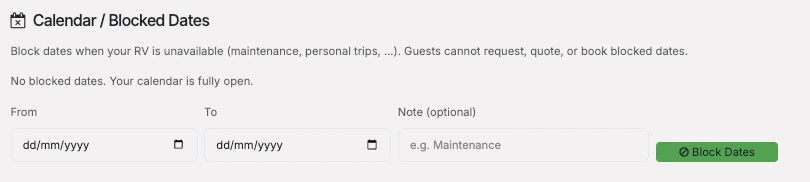
Step 4: Choose the dates you want to block
Under Calendar / Blocked Dates, enter:
- From: The first date your RV will be unavailable
- To: The last date your RV will be unavailable
- Note (optional): Add a reason for the block, such as Maintenance or Personal
Then select Block Dates.
Step 5: Confirm the dates are blocked
Once saved, the unavailable dates will appear as Blocked on your Booking Calendar.
The blocked date range will also appear under Blocked Dates, along with any note you added.
Guests cannot request, receive a quote for, or book your RV during blocked dates.
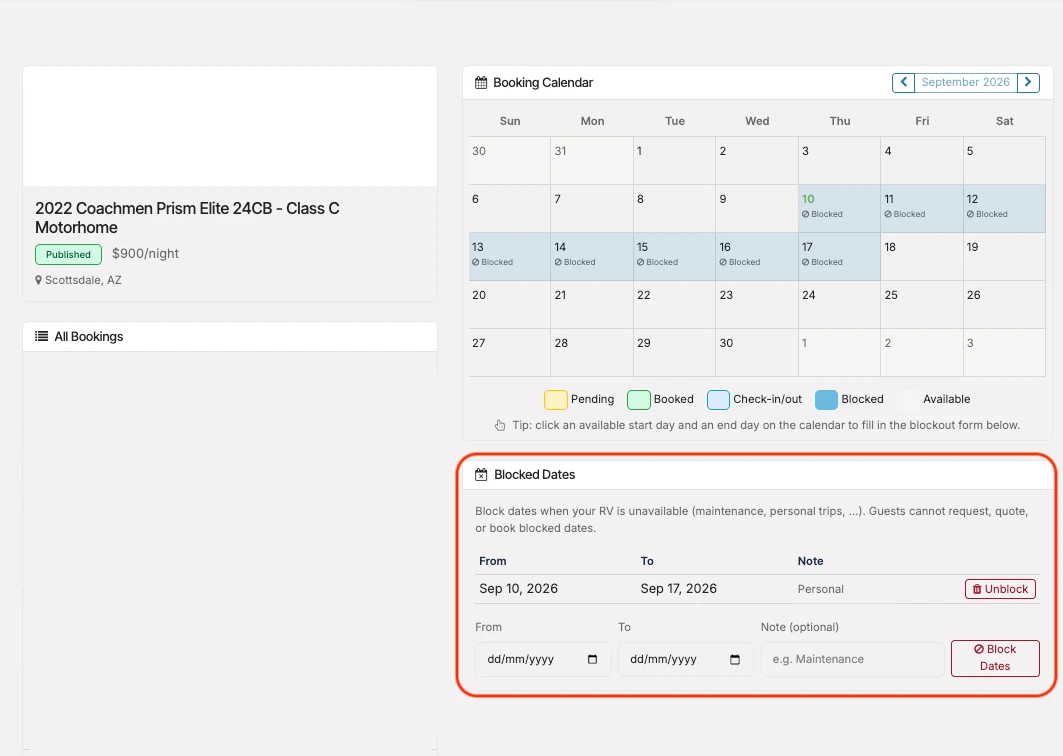
Need to make the RV available again?
Find the blocked date range under Blocked Dates and select Unblock. The dates will then become available again, provided there isn't another booking or restriction affecting those dates.
How do I check people in and out?
RVnGO's check-in and check-out process helps Hosts document the condition of their RV before and after a rental. Completing these steps helps create a clear record of the RV's condition and protects both the Host and Guest.
Checking In a Guest
When a reservation is ready for check-in, you can access the check-in process from the reservation page. You may also see an Upcoming Check-In banner at the top of RVnGO when a reservation is approaching its scheduled check-in time.
Select Check In to begin.
Take Pre-Trip Photos
Before handing the RV over to the Guest, you'll be prompted to take photos documenting its condition.
RVnGO recommends capturing:
- Exterior – Front
- Exterior – Back
- Exterior – Left
- Exterior – Right
- Interior
You can also take additional photos, including the odometer, generator hours, or any existing damage or areas you would like documented.
Photos are taken using your device's camera during the check-in process.
Important: Complete all required pre-trip photos before checking the Guest in. Checking in without the required photos may waive Property Protection coverage for damage to or theft of the RV.
Verify the Guest's Driver's License
Before handing over the RV, verify the Guest's driver's license as instructed on the check-in screen.
Confirm that the person picking up the RV matches the driver's license presented and that the license is valid.
Record Meter Readings
If applicable, enter the RV's current:
Odometer reading and Generator hours.
These fields may not apply to all RVs, such as trailers or RVs without an odometer.
Once you've completed the required check-in steps, select Complete Check-In.
Checking Out a Guest
When the Guest returns the RV, access the reservation from your reservation page to begin the check-out process.
You may also see a Check-Out banner at the top of RVnGO when the reservation is ready for check-out.
Follow the on-screen instructions to complete the return process and document the RV's condition.
Before completing check-out, carefully inspect the RV and record any relevant information requested by RVnGO. If you notice new damage or another issue with the RV, make sure it is properly documented before completing the process.
Once you've reviewed the RV and completed the required steps, follow the on-screen instructions to complete the Guest's check-out.
Helpful Tip
Take your time during both check-in and check-out. Clear photos and accurate documentation provide a record of the RV's condition at the beginning and end of the rental and can be especially important if an issue is reported later.
Walkthrough coming soon.
How do I start a Protection Plan Claim?
If your RV is damaged during an RVnGO rental and you need to start a Protection Plan claim, contact the RVnGO Protection Team by email at protection@rvngo.com as soon as possible.
What should I include in my claim email?
Providing complete information from the beginning can help the Protection Team review your claim more efficiently. Include as much of the following as possible:
- Reservation number
- Host's full name
- Guest's full name
- Date the damage or incident occurred
- Description of what happened, including how and when you discovered the damage
- Description of the damage and which areas of the RV are affected
- Pre-trip/check-in photos, if available
- Post-trip/check-out photos clearly showing the damage
- Additional photos or videos of the affected areas
- Police or incident report, if one was created
- Repair estimates, invoices, or receipts, if already available
- Any relevant communication with the Guest regarding the incident or damage
- Your preferred contact information in case the Protection Team needs additional details
Photos and documentation
When taking photos of damage, include both wide-angle photos showing where the damage is located on the RV and close-up photos showing the damage clearly.
Keep any damaged parts, receipts, estimates, reports, or other documentation related to the incident until the claim has been reviewed.
What happens next?
After receiving your email, the RVnGO Protection Team will review the information provided and contact you regarding any additional documentation or next steps required for the claim.
Submitting a claim does not automatically guarantee coverage or reimbursement. Any claim is subject to the applicable Protection Plan terms, eligibility requirements, and review.
Tip: The more complete your initial email is, the easier it is for the Protection Team to begin reviewing the incident without having to request basic information from you first.